Setting Up a Fresh DaDesktop Server
Deploy DD Node on GTHost / Hetzner Server
The guidance here steps you through rolling out a DaDesktop Node (Server) on a bare metal Linux box from providers like GTHost or Hetzner. Keep in mind these instructions may shift as the deployment script evolves over time.
This walk-through assumes you've already sorted a server and it'll be loaded with Ubuntu Jammy 22.04. Bear in mind that choosing RAID0, also called striping, can give disk access a real boost if you've got two or more drives with heaps of space. This needs to be configured in Hetzner using the 'installimage' tool while the system is in Rescue mode.
Prep work: OS installation on a GTHost / Hetzner Server
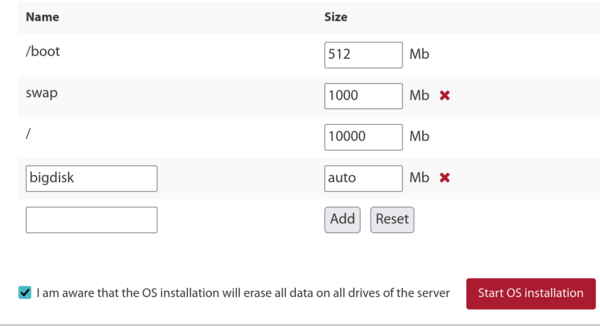
- To begin, SSH in with the root credentials you've been given, run 'apt update' and 'apt upgrade' to make sure everything's current. After that, do an 'apt autoremove' to clear out any redundant packages before you upgrade further.
- When working with Hetzner, you'll start in rescue mode, so you'll need to sort out your distro preferences, software RAID using mdm, the xfs filesystem, and IPV4 settings before rebooting and upgrading. It's usually sweet to go with the default settings for the small /boot and /boot/esp partitions, sticking with ext4 rather than xfs, and skip the swap partition entirely—it's not needed here. Let the / partition use xfs and grab all the remaining disk space.
- If you're on LeaseWeb or a different provider, you'll need to switch the main / filesystem from ext4 or btrfs to xfs. The notes here just serve as a rough guide. Honestly, setting things up so / uses xfs is trickier than simply defining /bigdisk to use xfs, because any filesystem changes have to happen outside the OS. Modifying the / filesystem type safely is no easy feat while it's mounted.
-
To build an xfs filesystem, use your provider's own tool if it's on offer—it makes life way easier. Otherwise, from the rescue system, you might run something like:
mkfs.xfs -f /dev/mdx (this formats / with xfs, and the -f flag forces an overwrite).
Note that we no longer carve out /bigdisk as a standalone partition; it's just a directory under / these days. - mount -t xfs /dev/mdX / from outside the OS, or use the system portal to achieve this.
- If you're still using a /bigdisk partition (which isn't common practice now), pop defaults,nofail 0 0 into /etc/fstab. This lets the system boot up fine even if the separate partition doesn't mount properly.
- systemctl daemon-reload so systemd picks up the changes in /etc/fstab
- mount -a, to verify the partitions have been created as needed, then double-check with df -T
-
Reboot
Kicking Off the DaDesktop Installation Script
- SSH into the server, for instance svr@xxxxxxxxx
- Run the install using the DaDesktop script, specifically:
- curl http://npg.io/d > d
- By this stage, you should upgrade the base operating system from 22.04 to the latest Ubuntu release, which is currently Ubuntu 23.10 Mantic and will soon tip over to Ubuntu 24.04 Noble.
- The smoothest way to do this is with the script called update-os, tucked away in /apps/dadesktop_npnode_deploy/modules/00-upgrade-os . This beats doing the dist upgrades manually, as it swaps the apt sources from jammy to mantic (nautic) in one hit instead of multiple steps. A quick heads-up—though hopping two releases at once is usually frowned upon, it’s perfectly safe here because there are bugger-all packages installed.
-
If you run into a DNS snag during the distro upgrade (we saw it happen once), here's the fix:
rm /etc/resolv.conf ; echo "nameserver 8.8.8.8" > /etc/resolv.conf - You might also want to set a hostname, say lo33uk.npg.io, if you're keen to create a DD node with a specific name, perhaps one you've used before. Give the box a reboot to apply the hostname if needed.
- Next up, we run the main script to get the DD Node installed. It's a good idea to use tmux to guard against a dodgy SSH connection dropping out mid-upgrade. Then, from the directory where you downloaded the script, just run 'bash d'.
- Keep an eye on the messages scrolling past for any errors. During the script, the server's IP gets whitelisted automatically, but you might need to hang tight for a couple of minutes for the cron job to refresh before you can carry on.
- Review how the script's tracking, and sort out or flag any issues that crop up.
- Execute the cleanup script at /apps/dadesktop_npnode_deploy/modules/00-cleanup. This one strips out a bunch of unnecessary packages and rolls back a few others.
- Run /apps/zabbix-agent/services/test-all.sh to hunt for any remaining hiccups.
- For any packages that are no longer maintained, zap them with apt purge xxx, yyy. Also tidy up any broken links that show up.
-
Then do a reboot, and give everything a good test.
Testing Your DD Node After the Install
- Check the new DD server entry in the DaDesktop interface and run a test using something like TPAPI.
- Set the start and expiry dates for the server inside DaDesktop, and pop it into a datacenter if that's needed.
- Verify the new server is ticking along in Zabbix, and deal with any alerts that pop up.
- Give it a whirl by adding a Standalone instance and getting it running.
- Assign the server to a Datacenter as required.
- If you feel like it, set up some Billing rules for the new server.
- Copy the Operating System templates over if they're needed.
- If it's on, give the Trainer or Coordinator a heads-up to use this specific server if it's ear-marked for a particular course.
Enjoy !